From Black & White to Colorful WOW: Creating an Eye-Popping Photography Website That Pops
From Black & White to Colorful WOW: Creating an Eye-Popping Photography Website That Pops - Pick a Striking Color Palette
Choosing the right color palette is one of the most important design decisions when creating your photography website. The colors you select will influence the overall aesthetic, create visual impact, and affect how viewers perceive your images.
Start by analyzing the style and mood of your photography. Are your photos bright and cheerful or moody and mysterious? Do they have a vintage film look or a sleek modern vibe? Your color palette should complement the feel of your work.
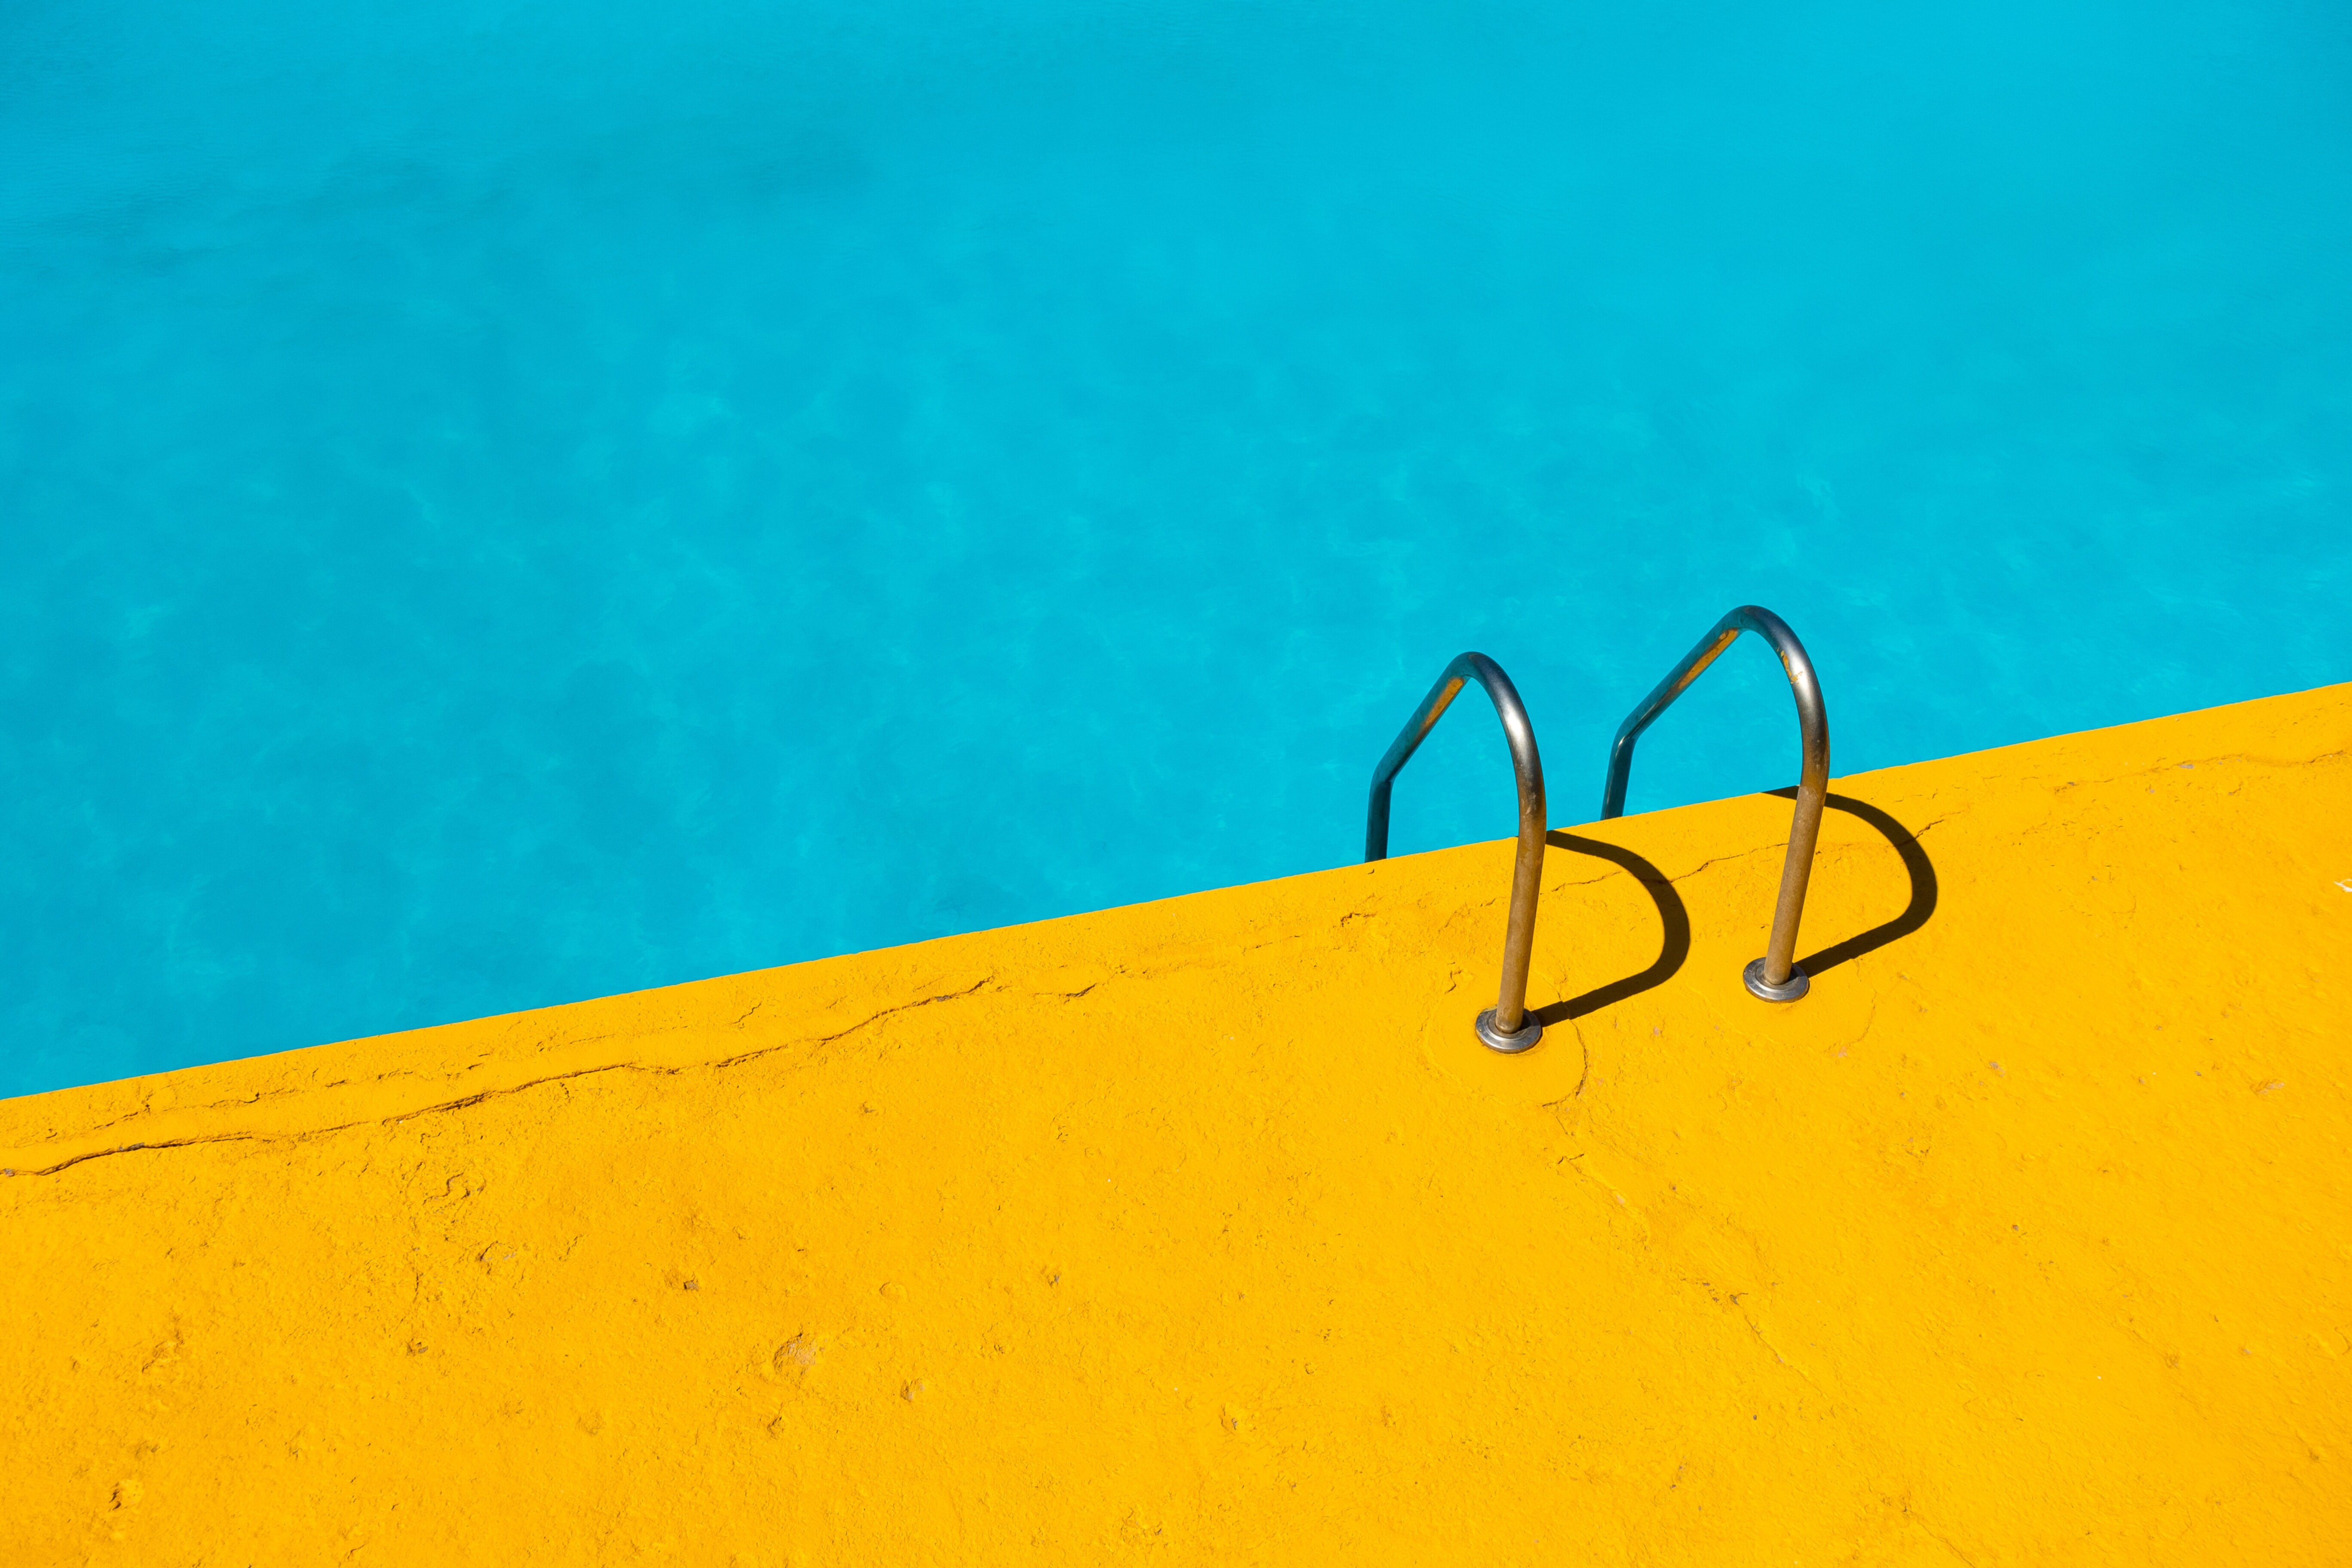
If your photos pop with vibrant hues, go bold with a energetic, saturated color scheme. Warm tones like orange, red and yellow bring excitement, while cool tones like blue, green and violet suggest tranquility. Don't be afraid to experiment with unexpected color combinations to make things stand out.
For a more subtle approach, stick to a limited palette of three to four harmonious colors. Monochromatic schemes using shades of a single color are elegant and sophisticated. Analogous combinations of hues beside each other on the color wheel, like blue and green, create a soothing cohesive look.
Remember that neutral backgrounds like white, gray or black allow the photos themselves to shine. Don't detract from your images with competing colors. White space adds breathing room and focuses attention on the visuals.
Beyond the overall mood, choose colors that enhance important elements on your site. For instance, make buttons and links a shade that contrasts with the background so they are easy to see and click. Use accent colors sparingly to highlight key areas like menus, logos and titles.
Study photography websites you admire and note effective color schemes. Resources like Adobe Color can help build a custom palette. Don't be rigid - adjusting hues, saturation and brightness can shift the feel.
From Black & White to Colorful WOW: Creating an Eye-Popping Photography Website That Pops - Curate Your Best Work
With unlimited storage available these days, it’s tempting to throw every photo you’ve ever taken up on your website. Resist that urge. Carefully curating a selection of your very best images is crucial for an effective photography portfolio site.
How do you narrow down the field and choose which photos make the cut? Start by identifying work that represents your unique style and vision. Include pieces that showcase your technical skills and creative strengths. The images should be visually cohesive and consistent in quality.
Aim to feature 10-20 standout photos per gallery or category. Avoid filler shots that distract from your best content. Generic snapshots or mediocre pictures will only dilute the impact of your portfolio.
When compiling your galleries, consider which images pair well together aesthetically. Arrange the photos in an intentional sequence that tells a story and draws viewers through the entire collection. Juxtapose different subjects, perspectives, and image styles to keep things interesting.
Take time to analyze and improve each image through editing. Adjust color, exposure, cropping, and other elements to make the photos look their absolute best. Poorly processed images reflect poorly on your skills.
Finally, remember to periodically update your site by swapping in new work and removing outdated or inferior content. Showcasing your latest and greatest projects will keep your portfolio fresh and engaging. Archive older images that no longer fit your evolving creative vision.
From Black & White to Colorful WOW: Creating an Eye-Popping Photography Website That Pops - Optimize Images for Quick Loading
A fast loading photography website is critical for pleasing visitors and search engines alike. Studies show that nearly half of web users expect pages to load in 2 seconds or less, and abandon sites that take too long. Google also factors site speed into search rankings. That's why optimizing your images for quick loading is a must.
High resolution photos look great, but giant file sizes bog down websites. Image optimization reduces file size while maintaining quality. Use tools like Photoshop, TinyPNG, or Kraken to compress JPEGs and PNGs without Noticeable loss of detail. Set images to 72 PPI since the web doesn't need print-quality 300+ PPI files. Convert large photos to responsive formats so they load appropriately for each device.
Lazy loading defers offscreen image loading until users scroll down to them. This prevents loading all visuals at once, speeding up initial page load. WordPress plugins like BJ Lazy Load make this a breeze to implement.
Selectively compress, crop or resize large images to just the size needed for each page layout. An image displayed at 400px wide doesn't need to be 5000px wide hogging bandwidth!
Downsample ultra high res images intended for print output to web resolutions. Convert RAW files into optimized JPEGs. Host media on a fast content delivery network like Cloudflare to load from servers nearest each visitor.
When saving JPEGs use moderate compression (60-80 quality). Higher levels don't show more detail but still increase file size. Save all edited versions to avoid repetitive processing each time an image is viewed.
Serve scaled, formatted versions of photos instead of making browsers resize on the fly. Image CDNs like Cloudinary can handle resizing and optimization then deliver cached versions for super speed.
Conduct speed tests like Lighthouse to measure real world loading times. Optimize until you strike a balance between visual appeal, performance and file size. While gaining a few milliseconds may seem trivial, even minor improvements add up, especially on mobile data.
From Black & White to Colorful WOW: Creating an Eye-Popping Photography Website That Pops - Make Navigation Intuitive
A cluttered, confusing website navigation will leave visitors frustrated and more likely to leave your site quicker. An intuitive, user-friendly menu allows viewers to easily access your content and delve deeper into your photography portfolio. Don't let complex navigation obscure your great images.
When organizing your menu, strive for simplicity. Limit primary navigation to five to seven main links like Home, Gallery, About and Contact. Avoid long drop-down sub-menus if possible. You want viewers to quickly grasp their options, not feel overwhelmed.
Categorize gallery pages by logical divisions that flow well together: Portraits, Landscapes, Black & White, etc. Use descriptive yet succinct wording that clearly indicates page content. “Project Galleries” tells the user nothing, while “Wedding Photography” sets clear expectations.
Ensure navigation elements feel cohesive through visual consistency. Use the same font, color scheme, styling and placement for menus on every page. This trains users where to look and creates intuitive habits. For instance, many sites position main navigation near the top-right of pages.
Breadcrumb trails providing clickable links back to parent pages help orient users navigating deep into your site hierarchy. For example, Home / Galleries / Nature shows the path back to the Galleries and Home pages.
Link icons can augment text navigation when meaningful. A tiny camera icon beside a “Gallery” link quickly signals that page features photography. Avoid generic icons like dots and arrows that add no value.
If using many menu levels, provide an obvious means to return to your homepage. Some sites default the logo or site name to link back to the home page when clicked. Others use a separate “Home” menu item. This saves users from hitting the browser back button repeatedly.
Ensure navigation remains visible at all times, even when scrolling down long pages. “Sticky” menus that stay fixed to the top of the page are now commonplace to avoid losing menu access mid-page.
Monitor page analytics to see which menus get used most. Visitors naturally gravitate toward navigation that succeeds in helping them find relevant content. Reorganize elements or add menu shortcuts based on usage patterns.
Test your navigation from a visitor’s perspective. Can a new user intuitively navigate your site hierarchy and find key pages quickly? Watch usability tests to pinpoint hang-ups. Refine menus based on feedback to smooth out the user journey.
From Black & White to Colorful WOW: Creating an Eye-Popping Photography Website That Pops - Craft Catchy Photo Captions
Don’t let your amazing photos go captionless. Well-written captions add context, emotion, and search engine optimization. Yet many photographers overlook this opportunity to engage viewers and enhance their work. Spend time crafting catchy, compelling captions that captivate as much as the images themselves.
Great captions tell a story. They reveal details beyond what’s visually apparent, like the location, subject’s name, or photographer’s personal connection. Describe the mood you aimed to convey or noteworthy techniques used to achieve the shot. Share an interesting backstory that inspired capturing the moment. Transport viewers into the scene by depicting what sounds, smells, textures, or other sensations surrounded you.
Voice captions conversationally in first-person “I” perspective to forge an intimate bond with the viewer. For example, “I laid on my belly in the tall grass until this shy fawn felt comfortable approaching.” Make people feel part of a special experience privy only to you the photographer.
Alternatively, second-person “you” voice can pull the viewer into a photo by speaking directly to them. “You can almost hear the eager chatter of the subway commuters hurriedly shuffling to work on this Tuesday morning in Brooklyn.” Just don’t overuse this technique lest it sounds cheesy.
Infuse personality into your writing. Inject excitement over a long-awaited landscape or gratitude for an affectionate pet photographed. Clever wordplay, poetic descriptors, humor, alliteration, rhyme and other creative language keeps captions compelling.
Photos with people become far more engaging by naming the subjects depicted. Instead of generic labels like “mother and daughter,” be specific like “Joy nuzzling her newborn daughter Sadie’s tiny hands.” It humanizes the subjects instead of leaving them anonymous.
Include relevant keywords and phrases that help images rank higher in search results. For cityscapes, note the specific landmark and location. Use descriptive terms someone searching for that kind of visual would likely use. Just be sure wording sounds natural.
From Black & White to Colorful WOW: Creating an Eye-Popping Photography Website That Pops - Enable Comments to Engage Visitors
User-generated comments are a valuable, yet often overlooked way to engage visitors and build community on photography websites. Enabling comments transforms your site from a static portfolio into an interactive space for discussion. Site owners reap multiple benefits by embracing comments.
For starters, comments allow visitors to provide feedback and reactions to your work. The thoughts they share lend insight into how people connect with and interpret your photos. Visitors may point out intriguing details you missed or share poignant memories stirred up. Their subjective experiences add richness and meaning to the images.
Comments also facilitate a dialogue where photographers can respond to questions, accept compliments, and forge bonds with those appreciating their art. Visitors feel valued knowing the artist cares what they think. Discussions in the comments personalize the viewing experience and cultivate an ongoing relationship.
Additionally, comments boost SEO by generating unique user-created content filled with keywords. Each new remark provides search engines more quality pages to index and rank. This inbound linking also sends signals about the relevance and popularity of pages commented on.
An active comment section indicates a thriving community enthusiastic about your work. Seeing existing discussions draws in newcomers eager to join the conversation. It shows your photos resonate enough for people to respond.
Photographers can also enable comments on individual images for feedback tied to specific pieces. This lets you gauge reactions to guide future work. It also helps contextualize images within a storytelling sequence or project narrative.
To encourage substantive comments, pose thoughtful questions or share behind-the-scenes details that prompt responses. Moderating and replying to remarks shows visitors their perspectives matter. Integrate commenting with social media for expanded reach.
While comments are immensely valuable, they also require diligent moderation. Actively filter out spam, hate speech, self-promotion and other distracting content. Foster an inclusive atmosphere where all feel welcomed to engagerespectfully.
From Black & White to Colorful WOW: Creating an Eye-Popping Photography Website That Pops - Promote Your Site to Drive Traffic
Once your photography website is polished and portfolio galleries curated, the next vital step is getting it in front of people. An amazing site is worthless if no one can find and visit it. Promoting your work is crucial for driving traffic, building your audience, and expanding professional opportunities.
Leverage social media to share your site content and grow your following. Post photos from new projects on Instagram and Facebook. Embed gallery previews or full images in tweets linking back to your site. Use relevant hashtags and location tags so images surface in searches. Follow and engage with users who interact with your posts to gain more exposure. Ask satisfied clients to share your site on their profiles and help spread the word.
Build relationships in online photography communities. Share work and provide feedback in forums like Flickr Groups and 500px. Comment on photos by artists you admire. Become a familiar face by regularly contributing quality content. Drop links to your website in profiles and forum posts when relevant so peers can learn more about your work. But avoid overt self-promotion that feels spammy. Let your art speak for itself.
Collaborate on joint projects that introduce your work to new audiences. Submit images to publications for features that include your site link. Guest post on prominent photography blogs sharing your specialized knowledge. The new fans and followers gained will boost site traffic when you announce new projects.
Pitch your services to businesses needing photography work for marketing materials, websites, signage, etc. Having actual clients with branding needs ensures your images get seen when promotions go live. Offer discounted or probono shoots for charities, non-profits, and community organizations in return for usage rights and photo credit. Local exposure can garner local traffic.
Submit pieces to photography awards/contests and art galleries/museums which typically link to artists’ websites. The prestige of selections helps attract collectors and new clients. Even minor recognition adds credibility that you can reference to catch people's interest.
Reach out to relevant bloggers, journalists, and influencers to see if they would review your portfolio or feature select photos. Don’t badger them, but politely pitch unique angles you think their audience would appreciate. Take advantage of the introductions these tastemakers provide.
Remember that high search visibility is key for being discovered online. Optimize website content for SEO best practices. Include alt text descriptions for screen readers and search bots. Write detailed image captions using targeted keywords. This improves chances of ranking in photo-related searches.
More Posts from colorizethis.io: